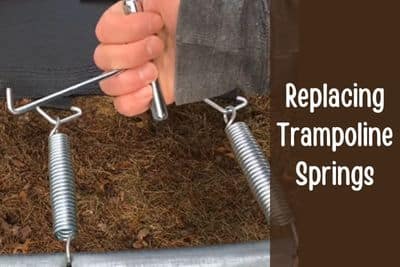
The installation and removal of trampoline springs are quite tricky compared to the other parts. If you don’t know the right way to do it, this might be hazardous too. So, how to put springs on a trampoline safely?
You can install trampoline springs using a spring tool or its alternatives. Hook the spring ends with the frame and mat one by one. And when dismantling the trampoline spring, pull the spring ends by the spring puller or its alternatives and detach them one by one.
Now, I’ll cover the easy ways to install trampoline springs and how to remove trampoline springs quickly.
Before You Get Started…
Let’s know a brief about the trampoline springs’ construction before starting to put on or remove the springs on a trampoline. This will ease the process.
Trampoline springs have two ends- a closed end and an open end. One end of the spring is fixed with the frame slot, and another one is in the v-ring of the mat.
The hook end that is comparatively more curved than the other end is called the closed end, and it usually goes with the v-ring of the mat. And the lesser curved hook end of the trampoline spring is called the open end that is attached to the trampoline frame slot.
A trampoline spring puller is an ideal tool to install or disassemble trampoline springs.
JumpKing trampoline spring loading tool is highly recommended here.

See Also: How to install a trampoline on the slope?
How to Put Trampoline Springs on?
After purchasing a new trampoline or during replacing the springs, you need to install springs on the trampoline. Here is the easiest way to put springs on a trampoline using a tool or without a tool.
i. How to Put Together Trampoline Springs Using Tool?
Depending upon your preference, you can install springs on a trampoline in dissimilar ways. However, here is a simple way that you can follow to complete spring assembly on the trampoline.
Step 1: Lay Down All the Springs
First, lay down all the springs and mats on the ground (after assembling the trampoline frame).
See Also: Tools needed to attach and detach a trampoline
Step 2: Attach First Four Springs

The first four springs assembly is very important. You can do it with or without any tools. Fix one hook end of the spring with a v-ring and another end with the frame hole.
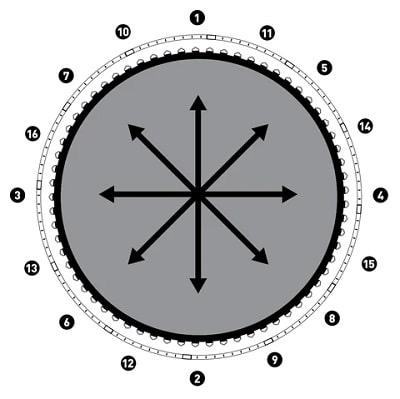
After assembling the first spring, position another spring just opposite the side of the frame and attach it to the mat and frame. Then attach the 3rd and 4th springs at the left and right side at the right angle to the 1st spring. So these four springs form a ‘+’ (plus) arrangement.
See the image for a better understanding.
See Also: How to tighten trampoline mat?
Step 3: Add Springs at Every Fourth Position
Now, connect a spring to each fourth slot which means skipping three positions, then add one spring. So, complete the array in this way, moving towards your left. You can use a spring tool or spring puller alternatives to connect the springs in place.
To do it, hook the closed end of the spring to the trampoline frame. Then hook the open end of the spring using a spring puller and pull it until it positions at the frame slot.
Read Also: How to attach and detach trampoline springs?
Step 4: Install Remaining Springs
You’ve already attached some springs. Still, there are numerous springs to put together the trampoline frame and mat. Now, add springs to these places using the spring puller or any other alternative tool and finish off the spring attachment.
The last couple of springs’ attachments might be quite hard due to the tension of the other assembled springs. So, do it carefully to avoid any injury.
See Also: How to eliminate trampoline springs noise?
Step 5: Final Checking
After attaching all the springs to the trampoline, check all the springs again that they are assembled well.
Congratulations on putting on the trampoline springs successfully. Now you can attach a safety pad and enclosure net before allowing kids to jump there.
The video below shows how to put together and remove the trampoline spring using a spring-pulling tool.
See Also: Know about trampoline assembly mistakes
ii. How to Install Trampoline Springs Without a Spring Tool?
After attaching the first four springs, you can use a spring itself to attach all the other springs. Just use the spring as a spring-pulling tool to attach the springs.
Now you might encounter an issue while attaching the last spring of the trampoline. In this case, you can use a screwdriver, pliers, or thread to hook the last spring.
See Also: Spring vs bungee rebounder
How to Remove Trampoline Springs?
Like trampoline springs attaching, you can dismantle trampoline springs either by using a spring pulling tool or spring tool alternatives.
a) How to Take Trampoline Springs Off Using Tool?

Spring pullers or spring tool alternatives (like pliers, caulking guns, and screwdrivers) can be used to take apart springs. So, how to remove springs from the trampoline?
When you want to disengage springs using a trampoline spring puller tool, or spring tool alternative just hook the open end (frame side) of the spring and pull it toward you. Thus, springs will be removed.
On the other hand, if you hook on the closed-end (mat-side) of the springs pull it toward the mat center until the spring detaches. Similarly, remove all the springs one by one.
See Also: How to install and take down trampoline enclosure net?
b) How to Take Apart Trampoline Springs Without Tool?
If you want to remove the trampoline springs without any tools, follow the process below. Grip the middle of any spring with your hand and pull it toward you until it removes from the frame slot. Then detach the other side too.
After that, use the first disassembled spring as a spring puller tool to dismantle all the other springs. Just hook any end of the trampoline spring with the ‘tool spring’ and pull it until the spring detaches from the frame or v-ring.
In this way, remove all the other springs without any spring tools. If springs are old or look rusty, don’t forget to use hand gloves.
If you are a visual learner, the following video will teach you how to take springs off without any tools.
See Also: Trampoline winterizing and spring removal
How to Replace Springs on a Trampoline?
The trampoline springs replacement process includes several steps such as-
- Remove the damaged or faulty springs.
- Measure the spring length of the existing spring.
- Repair the faulty springs if possible or purchase new springs.
- Put up the springs in the right place.
See Also: Install & take down mini trampoline
Bonus Tips to Assemble and Disassemble Trampoline Springs
- While dealing with springs, you can wear hand gloves to avoid injury.
- To make the trampoline bouncier, you can add more springs.
- Before installing the spring, make sure it’s rust-free and healthy.
- During attaching or detaching springs on the trampoline, keep kids and pets away.
- If needed, hire professionals.
Final Words
The right attachment of springs is important to get a proper bounce from the trampoline. It needs some effort and patience. If you are confident, then do it otherwise hire professionals to assemble or disassemble the trampoline correctly.
But I recommend every trampoline owner to learn how to put on and remove trampoline springs so you can do it in need of essence. Hopefully, after reading this article, you are now more confident. Share your thoughts if you encounter any issues to get suggestions from me.

Robert is a trampoline and rebounder trainer with a passion for blogging. He discovered his love for trampolining at a young age, when his father gifted him his first trampoline at the age of 9. Over the years, Robert has honed his skills and knowledge in the field, and now uses his expertise to train others.
Besides, helping fitness enthusiasts in the gym, Robert is very eager to share his knowledge and experience regarding trampolines and rebounder exercises with the readers of picktrampoline.com. He will share all you need to know about trampolines and rebounders in this blog. Get his tips on trampoline and rebounder!
