After purchasing an in-ground trampoline, you may look for easier ways to bury the trampoline in the ground, right? You can do it either by hiring professional installers or by building the sunken trampoline yourself.
In-ground trampoline installing is a fairly complicated compared to the regular trampoline assembly. So, how to install sunken trampoline? This includes marking the place, digging hole, placing frame, installing mat and springs, putting spring pad, etc. Hole preparation is time-consuming that requires lots of time.
This blog will guide you to build an in-ground trampoline easily. Let’s reveal the tips of the sunken trampoline DIY.
How to Install an In-Ground Trampoline Step by Step?
The step-by-step guide to installing an in-ground trampoline are-
- Choose good location
- Measure and mark the area
- Dig the hole
- Install the frame
- Attach the springs
- Assemble the mat
- Attach safety net and other accessories
- Add safety pad
- Fill the hole
- Test the trampoline
Now, I’ll explain them in-detail for your easy understanding.
Step 1: Choose Good Location

At first, find a level, grassy area in the yard to install the trampoline there. If the backyard is uneven, make it suitable for trampoline. Make sure there will be proper clearance surrounding the trampoline after assembling the trampoline.
Step 2: Measure and Mark the Area
Now measure the backyard using a measuring tape to be sure you’re in-ground trampoline will fit there well. Then, mark the ground according to the trampoline size. This will give you an idea of how much space you’ll need to dig out.
See Also: DIY trampoline making at home?
Step 3: Dig the Hole
Using a shovel, power auger, or excavator, dig out a hole that is at least 3 feet deep and as wide as the trampoline’s frame. Make sure that the hole is level and that the sides are straight. For exact hole depth follow manufacturer’s guidelines.
At the bottom of the sunken trampoline hole, you can put stones and other water-absorbing materials. Also, make good drainage from there to drain out stagnant water.
Note: You may need to make a sunken trampoline retaining wall surrounding the hole to secure the soil in place.
Step 4: Install the Frame
Once the hole is dug, place the trampoline frame into the hole. Be sure that the frame is level with the ground.
See Also: Is it okay to sink a regular trampoline in the ground?
Step 5: Attach the Springs
After placing the frame attach the springs to the frame according to the manufacturer’s instructions. Make sure that the springs are evenly spaced and that they are securely attached to the frame.
Step 6: Assemble the Mat
Now, attach the trampoline mat with frame and springs using the manufacturer’s instructions. Spring pulling tool or its alternatives will help to attach mat with sunken trampoline frame and spring.
Step 7: Attach Safety Net and Other Accessories
If you have a safety net, install it with poles. Make sure that the enclosure net is securely attached to the frame and that there are no gaps or holes.
If you want to add basketball hoop or other fun trampoline accessories attach them too with a safety net.
Step 8: Add Safety Pad
Now attach a sunken trampoline spring pad to make the trampoline safer and protect jumpers from spring-related injuries.
See Also: Trampolines in the desert
Step 9: Fill the Hole
Once the trampoline is assembled, fill in the hole around the frame with soil. Pack the soil firmly to provide support for the trampoline.
Step 10: Test the Trampoline
When you complete all the aforementioned steps, test the trampoline to make sure that it’s stable and that the mat is securely attached.
If you find everything is okay, you can now enjoy your new in-ground trampoline bounce.
See Also: Trampoline DIY ideas
Important Tips for In-Ground Trampoline Installation
Here I’ll give you some important in-ground trampoline installation guidelines so you can build the sunken trampolines perfectly for the proper bounce.
Ensure Good Airflow
Ground-level trampoline safety pad provides airflow in this trampoline. But, it’s not enough to create good jumping. That’s why the mat of the sunken trampoline should be a few inches high from the ground.
This will help good air passing under the trampoline thus you will experience safe and higher bounce. Without enough air escaping, the trampoline won’t give you the right bouncing.
So, the safety pad should ensure proper airflow, as well as the structure, should be quite high (5 to 10 inches) from the earth.
Sunken Trampoline Pit
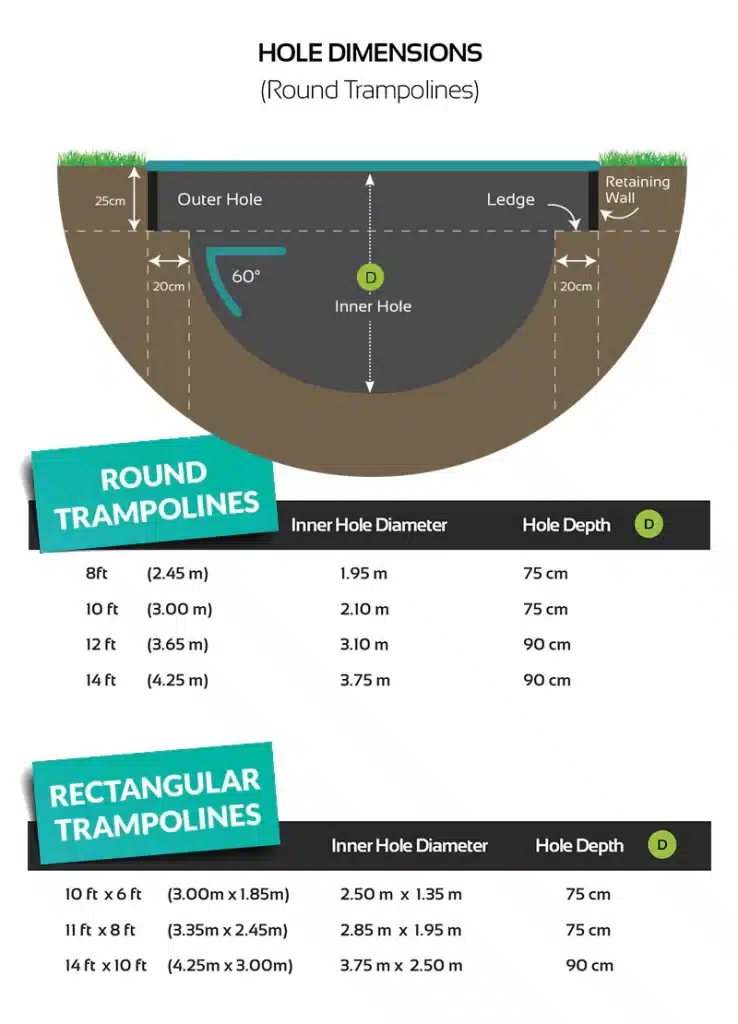
Sunken trampoline hole preparation is a mandatory task to install the in-ground trampoline. Depending upon, trampoline type, size, soil type, you have to dig the hole and prepare the ground. But, the most important thing is to follow the manufacturer’s guidelines.
While building retaining wall, consider the soil type and trampoline structure. If the trampoline comes with retaining wall kit, follow the manufacturer guideline during installation.
Here is a general guideline to dig sunken trampoline pit.

See Also: Sunken trampoline problems
Water Drainage
While installing low to the ground trampolines, you might need to make water drainage. The drain joins the in-ground trampoline pit and central drain of the backyard. So, stagnant water will pass through the drain easily.
Without proper drainage, rainwater stays in place in the pit even may waterlog the trampoline. This could damage the trampoline mat and springs. Thus, making a good drain while installing an in-ground trampoline hole is important.
The video below will give you some handy tips to install the in-ground trampolines properly.
See Also: Sunken trampoline’s cost
Bottom Line
Hopefully, you can now install the sunken trampoline following the above-mentioned instructions. If you encounter any issue, consult a professional installer.
However, it’s recommended to follow the manufacturer’s instructions and safety guidelines as the process may vary a bit from one trampoline to another. When you complete the installation, it’s time to jump and have fun there.
References:
1. https://www.jumpsport.com/in-ground-trampoline-installation/
2. https://aztrampoline.com/easy-to-install/
3. https://www.trampolines.com/blogs/trampoline-news/how-to-install-an-in-ground-trampoline

Robert is a trampoline and rebounder trainer with a passion for blogging. He discovered his love for trampolining at a young age, when his father gifted him his first trampoline at the age of 9. Over the years, Robert has honed his skills and knowledge in the field, and now uses his expertise to train others.
Besides, helping fitness enthusiasts in the gym, Robert is very eager to share his knowledge and experience regarding trampolines and rebounder exercises with the readers of picktrampoline.com. He will share all you need to know about trampolines and rebounders in this blog. Get his tips on trampoline and rebounder!
